
i think that this post is just BRILLIANT! i think i will just HAVE to use it come this winter... perhaps some red & green ones to stick in some hot peppermint cocoa & sipping by a fake fire playing over & over on the tv... ahhh, the life. beeteedubs, i'm very content with no fire. although someday...we shall...maybe... :)
anyways, ENJOY this post. and if i ever get around to doing the DIYs that i love, you'll be the first SECOND to see (adam will see firstsies)!
may i present to you:
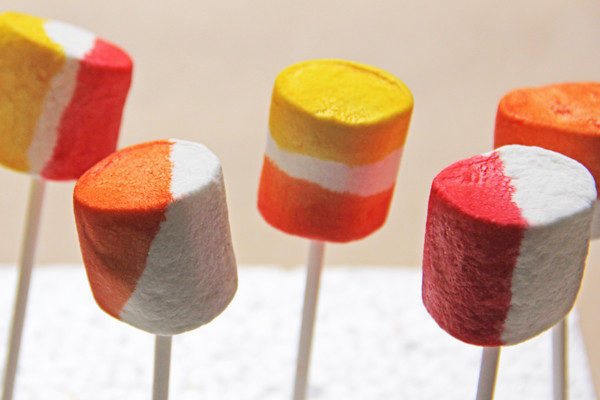
DIP DYED MARSHMALLOWS
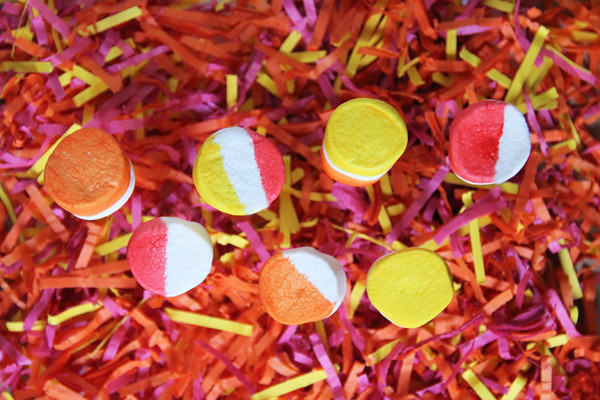
My favorite kinds of DIYs are the ones that don’t involve crazy, hard to find supplies but rather things you can pick up at your local grocery store or Target (of course). They’re the best kind of projects for budget-friendly parties, and late-night impulse projects too. This yummy DIY is inspired by a few of the season’s biggest trends: color blocking and dip dying. But why save that for fashion or home decor when you can make ‘em edible too!? Meet the dip-dyed marshmallows, ready and waiting to add a little color to your s’mroes and take their place on a colorful dessert bar!
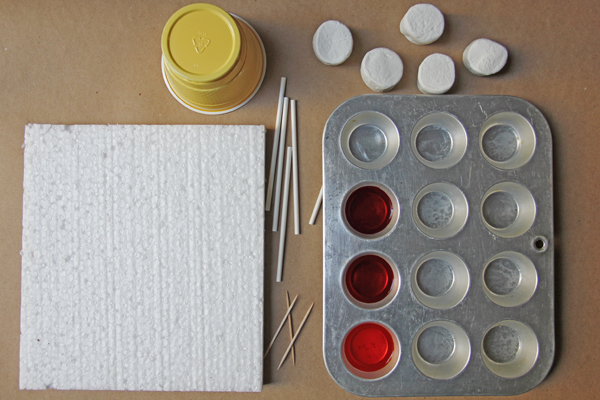
Here’s what you need :
- Marshmallows
- Food Coloring
- Water
- Muffin tin or cups for dipping
- Lollipop sticks or toothpicks (Optional, for display)
- Styrofoam or wax paper for drying
First prep your colors. You’ll want to minimize the water and maximize the color so you keep the yummy marshmallow consistency and taste, so I found a ratio of 20 drops of color for 2 tsp. water worked best. I used mini muffin tins to house my colors because the shallow depth made for easy dipping, but you could also use small cups or regular muffin tins.
If you’re making marshmallow pops, stick your marshmallow on a lollipop stick. If not, I recommend popping them on a toothpick for easy drying and pick up.
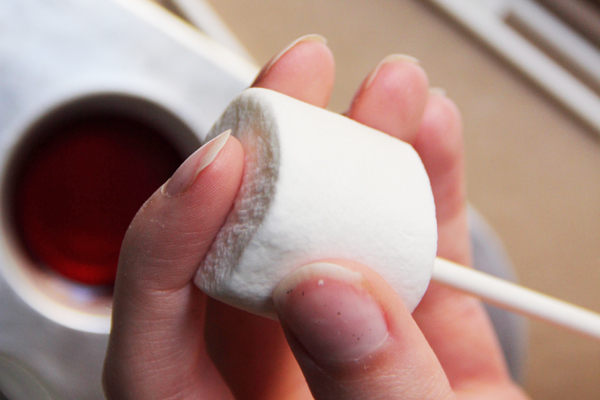
Now get to dippin’! I dipped a few tops, a few sides and a few on a diagonal for a nice color blocked variety.

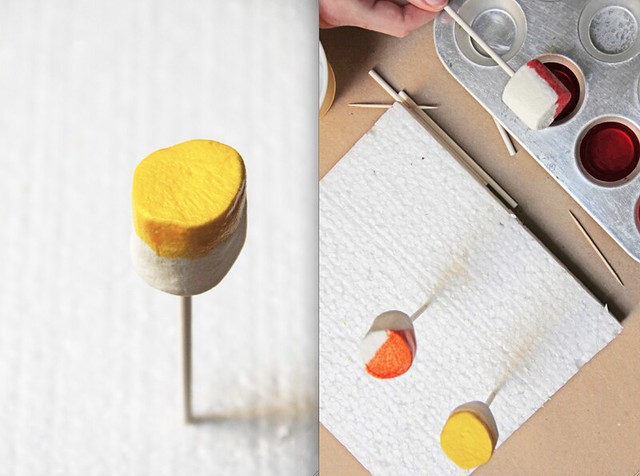
After you dip each marshmallow, make sure you let all the excess color drip off before you flip it over to dry completely. Make a drying rack with a piece of styrofoam or, if your marshmallows aren’t on sticks, allow them to dry (color side up when possible) on a piece of wax paper.
Here’s a few tips:
You only need to leave the marshmallow in the food coloring for a few seconds.
If you’re impatient like me, you can take an extra plastic cup, stick the marshmallow in and spin it around (Splatter warning!) to help get the excess off quickly.
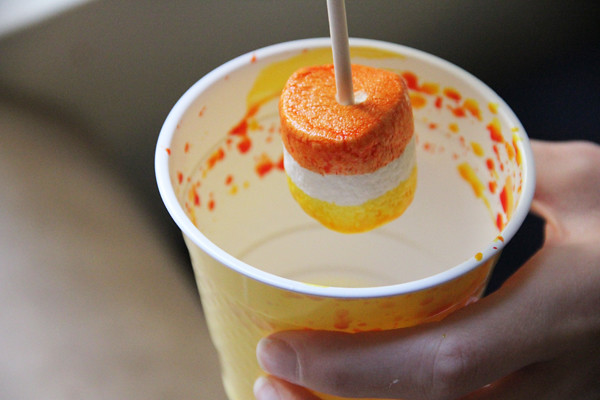
To make a two-toned version, dip your marshmallow in the first color before placing it on a stick. Then dip the other color and let dry.
It’s as simple as that! Add these to the list for your spring and summer parties, turn them pink and blue for a gender reveal or baby announcement, or, you know, just add them to the Friday night dessert menu.

--
anyways, ENJOY this post. and if i ever get around to doing the DIYs that i love, you'll be the first SECOND to see (adam will see firstsies)!
may i present to you:
DIP DYED MARSHMALLOWS
My favorite kinds of DIYs are the ones that don’t involve crazy, hard to find supplies but rather things you can pick up at your local grocery store or Target (of course). They’re the best kind of projects for budget-friendly parties, and late-night impulse projects too. This yummy DIY is inspired by a few of the season’s biggest trends: color blocking and dip dying. But why save that for fashion or home decor when you can make ‘em edible too!? Meet the dip-dyed marshmallows, ready and waiting to add a little color to your s’mroes and take their place on a colorful dessert bar!
Here’s what you need :
- Marshmallows
- Food Coloring
- Water
- Muffin tin or cups for dipping
- Lollipop sticks or toothpicks (Optional, for display)
- Styrofoam or wax paper for drying
First prep your colors. You’ll want to minimize the water and maximize the color so you keep the yummy marshmallow consistency and taste, so I found a ratio of 20 drops of color for 2 tsp. water worked best. I used mini muffin tins to house my colors because the shallow depth made for easy dipping, but you could also use small cups or regular muffin tins.
If you’re making marshmallow pops, stick your marshmallow on a lollipop stick. If not, I recommend popping them on a toothpick for easy drying and pick up.
Now get to dippin’! I dipped a few tops, a few sides and a few on a diagonal for a nice color blocked variety.
After you dip each marshmallow, make sure you let all the excess color drip off before you flip it over to dry completely. Make a drying rack with a piece of styrofoam or, if your marshmallows aren’t on sticks, allow them to dry (color side up when possible) on a piece of wax paper.
Here’s a few tips:
You only need to leave the marshmallow in the food coloring for a few seconds.
If you’re impatient like me, you can take an extra plastic cup, stick the marshmallow in and spin it around (Splatter warning!) to help get the excess off quickly.
To make a two-toned version, dip your marshmallow in the first color before placing it on a stick. Then dip the other color and let dry.
It’s as simple as that! Add these to the list for your spring and summer parties, turn them pink and blue for a gender reveal or baby announcement, or, you know, just add them to the Friday night dessert menu.
--
No comments:
Post a Comment
please leave me a little sunshine! :) i love hearing from you!